



Chafing Dishes for Catering: Types, Fuel and Setup
Running chafing dishes for catering starts with one practical rule: a chafer is a hot-holding system, not a way to cook food or bring cold food up to a safe serving temperature. Start with fully cooked, properly heated food, then use the right dish, heat source, water level, and buffet layout to maintain quality through service.
Table of Contents
- Key Takeaways
- Choose the Right Chafing Dish for the Menu
- Plan Fuel and Power for the Event
- Set Up a Safe, Reliable Buffet Line
- Frequently Asked Questions
Key Takeaways
Match the chafer to the food and venue. Rectangular units suit full buffet pans and larger portions; round units work well for soups, sauces, and compact stations.
Use a water pan as an operating control, not an afterthought. Too much water can overflow when the food pan is inserted; too little can evaporate and expose food to harsh, uneven heat.
Plan fuel using the number of burners, stated burn time, service duration, and a replacement allowance. Do not assume every fuel can performs the same way.
Fuel-heated chafers offer mobility, while electric and induction options can reduce open-flame concerns where appropriate power and venue approval are available.
Keep the buffet stable, supervised, and clear of napkins, loose linens, and guest traffic. Never move a lit chafer or a lit fuel can.
Choose the Right Chafing Dish for the Menu
Understand the basic system before choosing a style
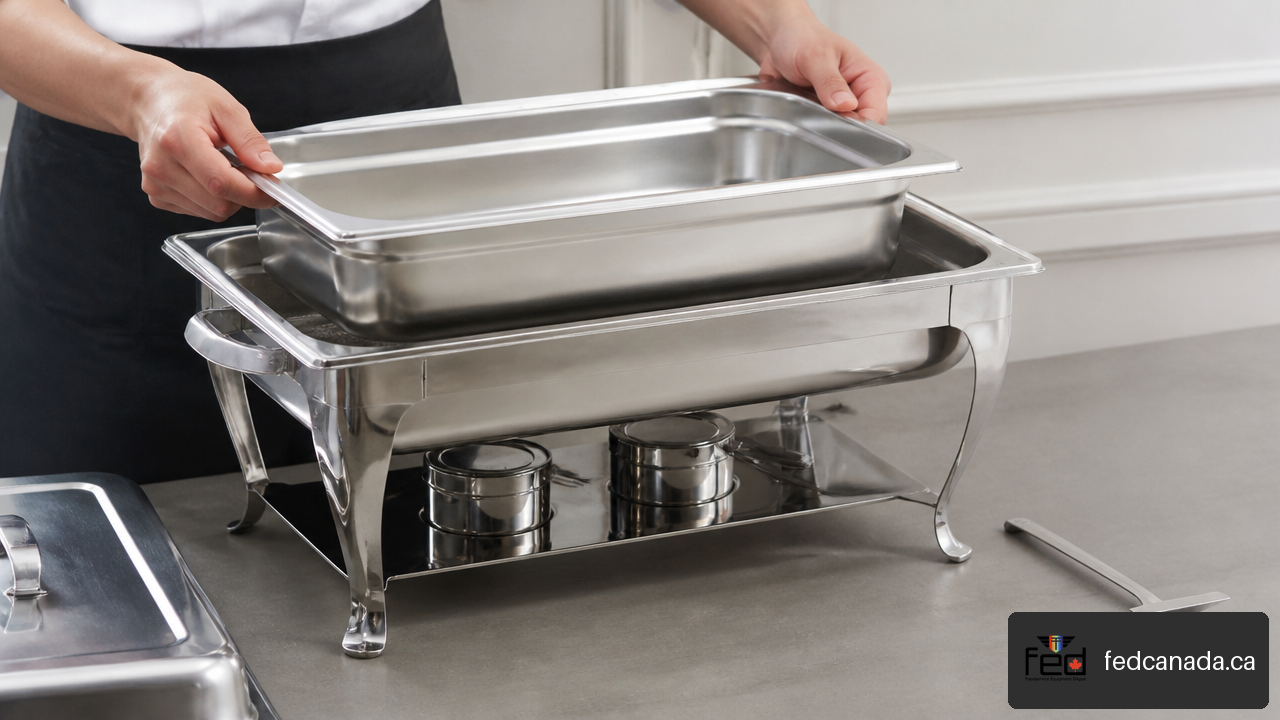
A conventional chafing dish has five working parts: a frame, water pan, food pan, lid, and heat source. Heat from fuel or an electric element warms the water pan; the heated water then transfers gentler, indirect heat to the food pan. This buffer is why chafers are generally better for holding prepared food than placing a pan directly over a flame.
The standard assembly sequence matters. A chafer is built from the frame, water pan, food pan, lid and fuel source, with enough room left in the water pan to prevent displaced water from overflowing when the food pan is inserted.
That last detail can prevent a surprisingly common service problem. A water pan filled near the rim may look fine until a deep food pan goes in. The inserted pan displaces water, which can spill onto the burner area, table linen, or floor. Start below the rim, insert the food pan carefully, and adjust only if needed.
Select a format based on service flow, not appearance alone
Round and rectangular chafing dishes do more than change the look of a buffet. Their geometry affects portioning, lid handling, table space, and how guests reach the food.
| Chafer format | Best suited to | Service advantage | Watch for |
|---|---|---|---|
| Rectangular full-size | Entrées, pasta, vegetables, rice, large buffet portions | Fits common hotel pans and supports organized portion lines | Long pans can develop cooler edges if food is spread thinly |
| Rectangular half-size | Side dishes, smaller menu items, lower-volume service | Lets several items fit into a limited buffet footprint | Small portions cool faster when lids stay open |
| Round | Soups, curries, sauces, mashed potatoes, compact stations | Easy central access and efficient use of a small table | Less convenient for foods usually prepared in rectangular pans |
| Disposable foil chafer | Casual or one-time service | Low up-front cost and simplified cleanup | Less rigid, less polished, and more vulnerable to bending or wind |
For a buffet with steady traffic, rectangular units often make portioning easier because utensils can rest along the pan edge and guests naturally move down the line. A round soup chafer, by contrast, keeps ladle service compact and reduces the awkward reach across a wide rectangular pan.
Capacity also needs a practical reading. A larger pan does not automatically mean better holding. If a large pan contains only a shallow layer of food, each time the lid opens, a wider surface is exposed to cooler air. For slow service, smaller pans replenished from a hot backup batch may protect quality better than one oversized, half-full pan.
Compare fuel, electric, and induction heating
The best heat source depends on the building and event format as much as the menu. Fuel chafers are mobile and do not depend on outlet placement. Electric units deliver more consistent controllability when outlets and electrical capacity are confirmed. Induction setups can be a strong option where open flames are restricted, but they require compatible cookware and a reliable power plan.
Chafers can be powered by fuel, electricity or induction, and gel and wick fuels use different combustion and fuel delivery mechanisms.
| Heating method | Choose it when | Avoid it when | Operational consideration |
|---|---|---|---|
| Fuel-heated | The buffet is mobile, outdoors, or far from outlets | The venue restricts open flames or ventilation is inadequate | Requires flame monitoring, compatible burners, and spare fuel |
| Electric | The venue provides confirmed outlets close to the buffet | Circuits are uncertain or cords would cross guest paths | Use dedicated, protected power where possible |
| Induction | Precise heat control and no flame are priorities | Compatible vessels or power capacity are unavailable | Verify pan compatibility and staff familiarity before service |
There is no universal answer for indoor use. Venue rules, local fire requirements, the exact fuel product, ventilation, and the event layout all matter. Confirm these conditions before purchasing fuel, not when the buffet is already dressed with linen and food.
For electric and induction chafers in Canada, look for a cUL or CSA listing and check the plug and amperage. Most portable units run on standard 120V outlets, but several units on one circuit can trip a breaker, so confirm which outlets are on separate circuits before the event. For a permanent buffet or cafeteria line, an electric steam table can be a more practical hot-holding option than portable chafers.
Plan Fuel and Power for the Event
Choose compatible gel or wick fuel
Gel fuel burns as a gel in a canister. Wick fuel burns liquid fuel through a wick, and some products provide a dampener or other method of adjusting flame output. Fuel colour, can size, and packaging style are not reliable substitutes for reading the label.
Check four points before service:
The fuel type is approved for the burner and fuel holder.
The product label states the expected burn time and any ventilation or handling instructions.
The burner has a working cover, dampener, or snuffer method suited to that model.
The venue permits that fuel and open-flame arrangement.
A wick system may be preferable when a compatible burner provides controlled flame adjustment. A gel can may be a straightforward choice for standard disposable or reusable chafer setups. Neither category is automatically safer or more economical in every circumstance; the practical outcome depends on the specific product, burner design, service length, and heat loss from the room or outdoor environment.
Calculate the number of fuel cans before the event
Use the fuel label’s stated burn time as the starting point, then add a realistic operating allowance. The planning calculation is simple:
Fuel cans needed = number of active burners × cans per burner (total service hours ÷ stated burn hours per can, rounded up), plus a replacement allowance.
For example, consider six rectangular chafers using two burners each. That is 12 active burners. If service is expected to last 2.5 hours and the selected fuel is labelled for 4 hours, each burner needs one can (2.5 ÷ 4 = 0.625, rounded up to 1), so the base requirement is 12 cans. A can cannot be shared between burners, so do not divide the total service time across them. Add a reasonable replacement allowance for delayed service, a colder room, or a burner that needs changing, and the event team might stage 14 to 16 cans in a secure, approved location.
This is a planning estimate, not a guarantee. Actual burn performance can vary with the burner, flame setting, draft exposure, and product formulation. The point is to avoid two opposite mistakes: running short mid-service or stacking unnecessary fuel cans around the buffet.
Treat fuel changes as a controlled task
Never add a new fuel can beside a burning one or top up an active burner. Chafing fuel manufacturers instruct users to extinguish existing fuel before adding more.
A controlled replacement sequence is safer and easier to manage:
Assign the task to a staff member rather than leaving it to guests.
Use the proper snuffer or cover to extinguish the flame.
Allow the burner and can area to cool as required by the fuel instructions.
Remove the spent can, inspect the holder, and place a compatible replacement in position.
Relight only when the station is stable, clear, and attended.
If a chafer is losing heat before the scheduled fuel change, do not immediately assume the can is defective. First check whether the lid has been left open, the water pan is low, the burner is partially closed, or a cold draft is crossing the buffet.
Set Up a Safe, Reliable Buffet Line
Build the chafer in the right order
Set up the frame on a stable, heat-resistant surface. Place the water pan into the frame, add hot water, position the fuel or activate the electric heat source, and allow the unit to warm before adding hot food. A common setup sequence uses about one inch (2.5 cm) of hot water, roughly 20 minutes of preheating, and then the addition of hot food.
The amount of water must suit the pan and chafer. One inch (2.5 cm) is a useful starting point for many units, not a universal fill line. Deep pans, shallow pans, and different water pan designs displace water differently. The correct operating condition is enough water for indirect heat, with adequate headroom to avoid overflow when the food pan is seated.
A chafer should hold food that is already hot. It may slow cooling, but it is not designed to safely reheat refrigerated trays or compensate for food that left the kitchen under temperature. In Canada, food safety guidelines generally call for hot food to be held at 60°C (140°F) or higher. Confirm the requirements of your provincial or local health authority, and verify food temperature with a suitable probe thermometer during longer service.
Lay out the buffet for safety and service speed
A tidy buffet is not automatically a safe buffet. Build in clear space around each chafer so guests can serve food without reaching over fuel, brushing against lids, or setting napkins too close to the frame.
Use this layout check before food arrives:
Confirm each table is level, stable, and capable of supporting filled water and food pans.
Keep napkins, disposable plates, loose tablecloth edges, packaging, and decorations away from fuel and hot surfaces.
Give guests a clear approach and exit path, with utensils positioned toward the serving side.
Reserve a staff access route behind or beside the buffet for temperature checks, replenishment, and fuel monitoring.
Keep an appropriate snuffer available at every fuel-heated station.
Avoid placing cords where guests, carts, or staff can trip over them.
The University of Maryland Fire Marshal’s chafing fuel guidance states that lit fuel should be secured and monitored, kept away from combustibles, and extinguished with a snuffer or saucer. The same principle applies to buffet design: keep the heat zone controlled, visible, and free of clutter.
Prevent drying, scorching, and uneven heating
Food quality problems usually begin with one of three conditions: insufficient moisture, excess direct heat, or too much time with the lid open. Sauced dishes, braises, and soups generally hold more forgivingly than crisp fried items, delicate fish, or foods meant to stay dry and crunchy.
| Problem | Likely cause | Practical recovery |
|---|---|---|
| Food is drying at the edges | Lid stays open; shallow food layer; long holding time | Refill with a hot backup pan, keep the lid closed between servings, and use smaller pans if volume is low |
| Water pan is boiling hard | Flame output is too high or water level is too low | Reduce heat if the burner allows it, check water safely, and avoid aggressive boiling |
| Centre is hot but edges cool | Food is spread too thinly or pan is opened frequently | Stir suitable foods carefully, consolidate into a smaller pan, and replenish with hot food |
| Water has disappeared | Long service, high flame, or low initial fill | Extinguish heat if necessary, allow safe handling, then restore water without splashing fuel area |
| Chafer is not holding heat | Fuel is low, burner is restricted, or drafts are cooling the station | Inspect the fuel and burner, close the lid, and move only after extinguishing if relocation is required |
Fair warning: adding water to an active, hot chafer demands care. Avoid splashing near flame or hot metal. If the water pan has run dry, the safer response may be to extinguish the heat, stabilize the station, and reset it rather than rushing through a refill during peak guest traffic.
Frequently Asked Questions
What is a chafing dish, and how does it keep food warm?
A chafing dish is a buffet serving system that uses indirect heat beneath a water pan to help maintain prepared food at serving temperature. The heated water buffers the food pan from the strongest direct heat. It is intended for hot holding, not cooking or reheating cold food.
Which type of chafing dish is best for a buffet?
Rectangular chafers are usually the most flexible choice for entrées and sides because they accept common food pan sizes and support an orderly serving line. Round chafers suit soups, sauces, and compact stations. The best choice depends on menu volume, pan size, table space, and how quickly food will be replenished.
What is the difference between gel fuel and wick fuel?
Gel fuel burns as gel in a canister. Wick fuel burns liquid fuel through a wick. Some wick systems offer flame adjustment through a compatible dampener or burner design. Always follow the fuel label and use only the fuel intended for your burner and holder.
How long does chafing dish fuel burn?
Burn time varies by product, can size, flame setting, and conditions. Use the manufacturer’s stated burn time to calculate a base requirement, then carry a replacement allowance for delays or difficult conditions. Do not assume one can will last for an entire event without checking its label.
Can chafing dishes be used indoors?
They can be used indoors only when the venue, local rules, ventilation conditions, and fuel instructions allow it. If open flames are restricted, an electric or induction chafer may be a more suitable option, provided the power supply and equipment compatibility have been confirmed.
How much water should go in the water pan?
Many setups begin with approximately one inch (2.5 cm) of hot water, but the right amount depends on pan depth and water displacement. Fill below the rim, seat the food pan carefully, and make sure water does not overflow. Monitor the water level during extended service.
Should a chafing dish preheat before food is added?
Yes. Preheating helps the water pan establish stable heat before food is inserted. A common sequence allows about 20 minutes after lighting fuel or activating heat, then adds already hot food. Keep the lid closed as much as practical once service begins.
Can I move a chafing dish while the fuel is lit?
No. Extinguish the fuel first, then allow the equipment to cool enough for safe handling. Moving a lit unit risks spills, burns, and contact between flame and nearby materials.
Are residential chafing dish sets suitable for catering?
They can work for occasional home use, but catering puts far more demand on equipment. Commercial chafers use heavier-gauge stainless steel, accept standard hotel pans, and are built to withstand repeated transport, washing and long service. Residential sets often use thinner materials and non-standard pan sizes, which makes backup pans and replacements harder to manage. For electric units, also confirm a cUL or CSA listing.
Planning a catering setup or a permanent buffet line? Call or visit our team. New equipment is available through our catalogue with pricing online, and used and clearance items are available for pickup at our Calgary warehouse.
Recent Posts


Leave a Comment
Your email address will not be published. Required fields are marked *